
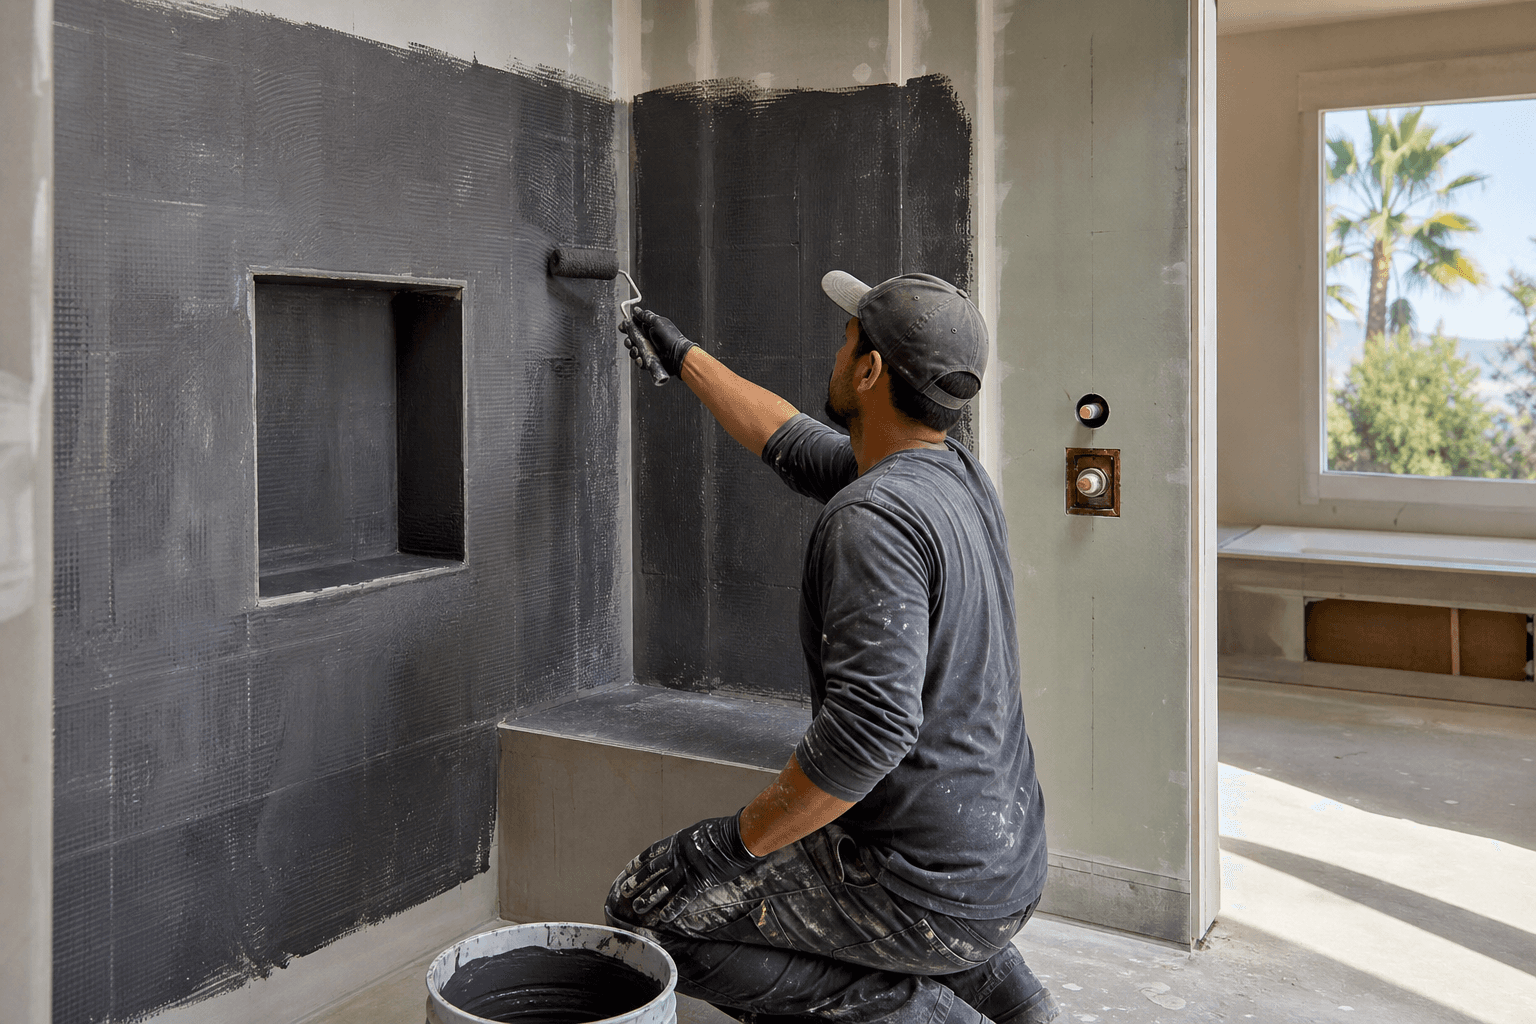
Successful spa bathroom waterproofing starts beneath the tile. The work should follow a planned sequence: define every wet area, prepare and inspect the substrate, install one compatible waterproofing system, treat seams and penetrations, and review the completed waterproofing before finishes begin. Tile and grout provide the visible finish, but they should not be treated as the waterproofing strategy.
That sequence matters even more when a bathroom includes a steam shower, wet-room layout, recessed niche, built-in bench, or multiple plumbing fixtures. JR07 Development provides bathroom remodeling services, including spa-inspired bathrooms, premium tile, and architectural fixtures, for homeowners throughout Southern California.
Step 1: Define the Waterproofing Envelope
Before choosing tile or fixtures, identify every surface that may receive regular water, spray, runoff, splash, or steam. The obvious areas include the shower floor and walls, but spa-style layouts often contain additional exposure points.
Mark the intended wet-area boundaries on the plan or in the room. Depending on the design, that review may include:
- Shower floors and surrounding walls
- Wet-room floors and nearby wall surfaces
- Steam shower walls, ceilings, and door areas
- Built-in benches, ledges, shelves, and recessed niches
- Curbs, thresholds, and transitions between wet and dry areas
- Wall-to-floor joints and changes in plane
Stop point: Confirm the wet-area boundaries before substrate work proceeds. If the design changes later, the waterproofing plan may need to change with it.
Step 2: Prepare and Inspect the Substrate

Waterproofing depends on what lies beneath it. The substrate should be reviewed for damage, movement, open joints, uneven areas, contamination, and other conditions that could interfere with the selected system. Surfaces also need to be shaped appropriately for the planned floors, walls, niches, benches, and drains.
This is not the stage to hide unresolved problems behind a membrane or tile. A careful review should ask:
- Is the surface sound and free from visible damage?
- Are plane changes and transitions clearly formed?
- Are openings and penetrations located where the design requires them?
- Is the surface clean and ready for the selected waterproofing materials?
- Can the waterproofing system be installed continuously around the planned features?
Stop point: Correct substrate concerns before waterproofing begins. If the installer cannot clearly explain how the system will move across a damaged area, joint, corner, or change in plane, pause and resolve that question first.
Step 3: Select One Compatible Waterproofing System
A spa bathroom should not be assembled from unrelated waterproofing products simply because they are available. The membrane, bonding materials, sealants, drain components, corner treatments, and other accessories should work together as a defined system.
Ask the contractor which system is being proposed and request the relevant installation documentation. The documentation should explain how the system handles the surfaces and details in your design. Manufacturer requirements can vary, so avoid assuming that a method suitable for one product is suitable for another. The LATICRETE waterproofing guidance is one example of the type of manufacturer information to review, not a universal specification for every bathroom.
Also confirm who is responsible for coordinating the waterproofing system with the drain, plumbing fixtures, tile assembly, and built-in features. Clear responsibility helps prevent gaps between trades.
Step 4: Cover Walls, Floors, and Changes in Plane
The goal is a continuous waterproofing envelope across the areas defined in Step 1. That means the installation should be considered as a connected assembly rather than a collection of isolated patches.
Pay attention to the relationship between:
- Walls and floors
- Adjacent walls at inside corners
- Outside corners and exposed edges
- Vertical walls and horizontal benches or ledges
- Shower areas and bathroom thresholds
- Wet-room surfaces and nearby dry-area finishes
Tile, grout, and decorative trim should not be used to compensate for missing or incomplete waterproofing beneath them. Once the main coverage is installed, inspect the surface for visible gaps, interruptions, or areas that were overlooked around framing and fixtures.
Stop point: Review continuity before concentrating on individual details. It is easier to correct an incomplete area before corners, fixtures, and finishes make access more difficult.
Step 5: Seal Seams, Corners, and Transitions
Seams and changes in plane deserve deliberate treatment because they connect separate surfaces within the waterproofing envelope. A practical inspection should include:
- Inside corners where two walls meet
- Outside corners and exposed edges
- Wall-to-floor joints
- Bench-to-wall and ledge-to-wall connections
- Thresholds, curbs, and other wet-to-dry transitions
- Seams between sheets, coatings, or system components
Do not rely on appearance alone. Ask how each seam or transition is treated within the selected system and whether the installer is following the manufacturer’s documented method. This is especially important where several materials meet or where a transition will later be covered by trim.
Stop point: Before moving on, verify that every planned seam and transition has a defined treatment. If a detail is not shown in the system documentation or cannot be explained clearly, stop for clarification.
Step 6: Treat Drains, Plumbing, and Other Penetrations
Every opening through the waterproofing envelope needs individual attention. In a spa bathroom, these may include shower drains, supply lines, valves, shower controls, body sprays, tub connections, and other fixtures or accessories.
Ask these questions before the area is closed up:
- How does the selected system connect to the drain assembly?
- How are pipe and valve penetrations sealed?
- Are fixture locations final before waterproofing is installed?
- Can future service be performed without unnecessarily damaging finished surfaces?
- Are accessory penetrations included in the waterproofing review?
Penetrations should not be treated as an afterthought. A late fixture change can create a new opening or require a repair, so coordinate the plumbing and waterproofing sequence before tile work begins.
Step 7: Waterproof Niches, Benches, and Built-In Features
Spa bathrooms often include features that make the room more comfortable and distinctive, but every additional ledge, recess, or horizontal surface creates another detail to coordinate.
Review recessed niches, floating or built-in benches, shelves, ledges, and other custom elements for:
- Continuous coverage across the feature and its surrounding walls
- Sealed inside corners and joints
- Compatible transitions between the feature and the wall assembly
- Drainage and surface shaping appropriate to the selected design
- Penetrations for fixtures or accessories
- Clear access for inspection before tile is installed
These details should be addressed as part of the waterproofing plan, not left for the tile installer to solve visually. A beautiful niche or bench still needs the same careful continuity as the larger wall and floor surfaces around it.
Step 8: Stop Before Tile and Review the Work
The pre-tile review is the most important decision point in the sequence. Once tile, trim, and fixtures are installed, many waterproofing details become difficult to see or reach. Review the work while the waterproofing layer is still accessible.
Use this checklist:
- Is the intended wet-area coverage complete?
- Are floors, walls, corners, and changes in plane treated continuously?
- Are seams and transitions addressed according to the selected system?
- Are drains and plumbing penetrations sealed using compatible details?
- Are niches, benches, ledges, and shelves included?
- Are thresholds and wet-to-dry transitions clearly treated?
- Are the relevant manufacturer instructions available for review?
- Has the contractor explained any required inspection or verification step for the selected system?
Do not allow uncertainty to be covered by tile. The selected manufacturer’s waterproofing instructions should guide system-specific installation and review. Waterproofing and tile installation are related stages, but they are not interchangeable: tile and grout are the finish, while the waterproofing layer protects the underlying assembly.
How Is a Spa Bathroom Different From a Standard Bathroom?
The difference is usually the complexity of the wet-area design, not simply the room’s appearance. A standard bathroom may have a defined shower area with relatively few built-in features. A spa-style bathroom may add a steam area, a larger wet-room footprint, multiple spray locations, benches, niches, ledges, or transitions that connect several surfaces.
Those features create more points to coordinate. They can also make the boundary between wet and dry areas less obvious. The right response is not to assume that one method fits every bathroom. Instead, define the exposure, select a compatible system, and review each connection before finishes cover the work.
If the design includes steam, ask the contractor to explain how the proposed system is intended to address that environment and which manufacturer documentation applies. If the design includes a wet room, ask how the floor, walls, drain, thresholds, and adjacent surfaces connect within one plan.
When Should You Hire a Remodeling Contractor?
Professional help is particularly appropriate when the project combines structural changes, a steam shower, a wet-room layout, several plumbing penetrations, custom niches or benches, or a waterproofing system you do not know how to coordinate. These projects require more than choosing tile. They involve sequencing, trade coordination, substrate preparation, fixture planning, and a pre-tile review.
When comparing a residential remodeling contractor, ask:
- Are you licensed and insured for this type of project?
- Who is responsible for coordinating the waterproofing, plumbing, framing, and tile work?
- Which waterproofing system is proposed, and where can I review its instructions?
- How will you handle niches, benches, drains, corners, and plumbing penetrations?
- What is the point of review before tile installation?
- Who will communicate updates and answer questions during the work?
- Will the scope and pricing identify the waterproofing work clearly?
JR07 Development is a licensed, bonded, and insured general contractor that reports more than 25 years of experience and more than 500 completed projects across residential, commercial, and hospitality work. The company assigns a dedicated project manager to each project and emphasizes transparent pricing with no hidden fees. Those facts do not replace project-specific questions, but they give homeowners useful criteria when evaluating a bathroom remodeling partner.
What Should Southern California Homeowners Confirm?
For a project in Southern California, begin by confirming that the contractor serves your location and can manage the complete bathroom scope. JR07 Development serves Los Angeles, Orange, San Diego, and Riverside counties, as described on its Southern California service areas page.
Before work begins, ask for a clear explanation of the proposed waterproofing system, the wet-area boundaries, the treatment of built-ins and penetrations, and the review that will happen before tile. Also confirm how the project manager will communicate decisions, changes, and progress. Clear scope and communication are especially valuable when a design includes several custom details.
Do not rely on a general statement that a bathroom is “waterproof.” Ask what is covered, how the details are treated, and what must be verified before the finish layer is installed.
The Final Check Before Your Spa Bathroom Is Tiled
A reliable spa bathroom waterproofing plan follows a controlled sequence: define the waterproofing envelope, prepare the substrate, use a compatible system, connect floors and walls continuously, treat every seam and penetration, and inspect niches, benches, drains, and transitions before tile begins.
The most useful question is simple: can the contractor show how every wet-area detail connects within the selected system? If the answer is unclear at a corner, drain, bench, niche, or plumbing penetration, resolve it before the finish materials cover the work.
For a professional bathroom remodeling estimate in Southern California, contact JR07 Development through its quote request page to discuss your project.