
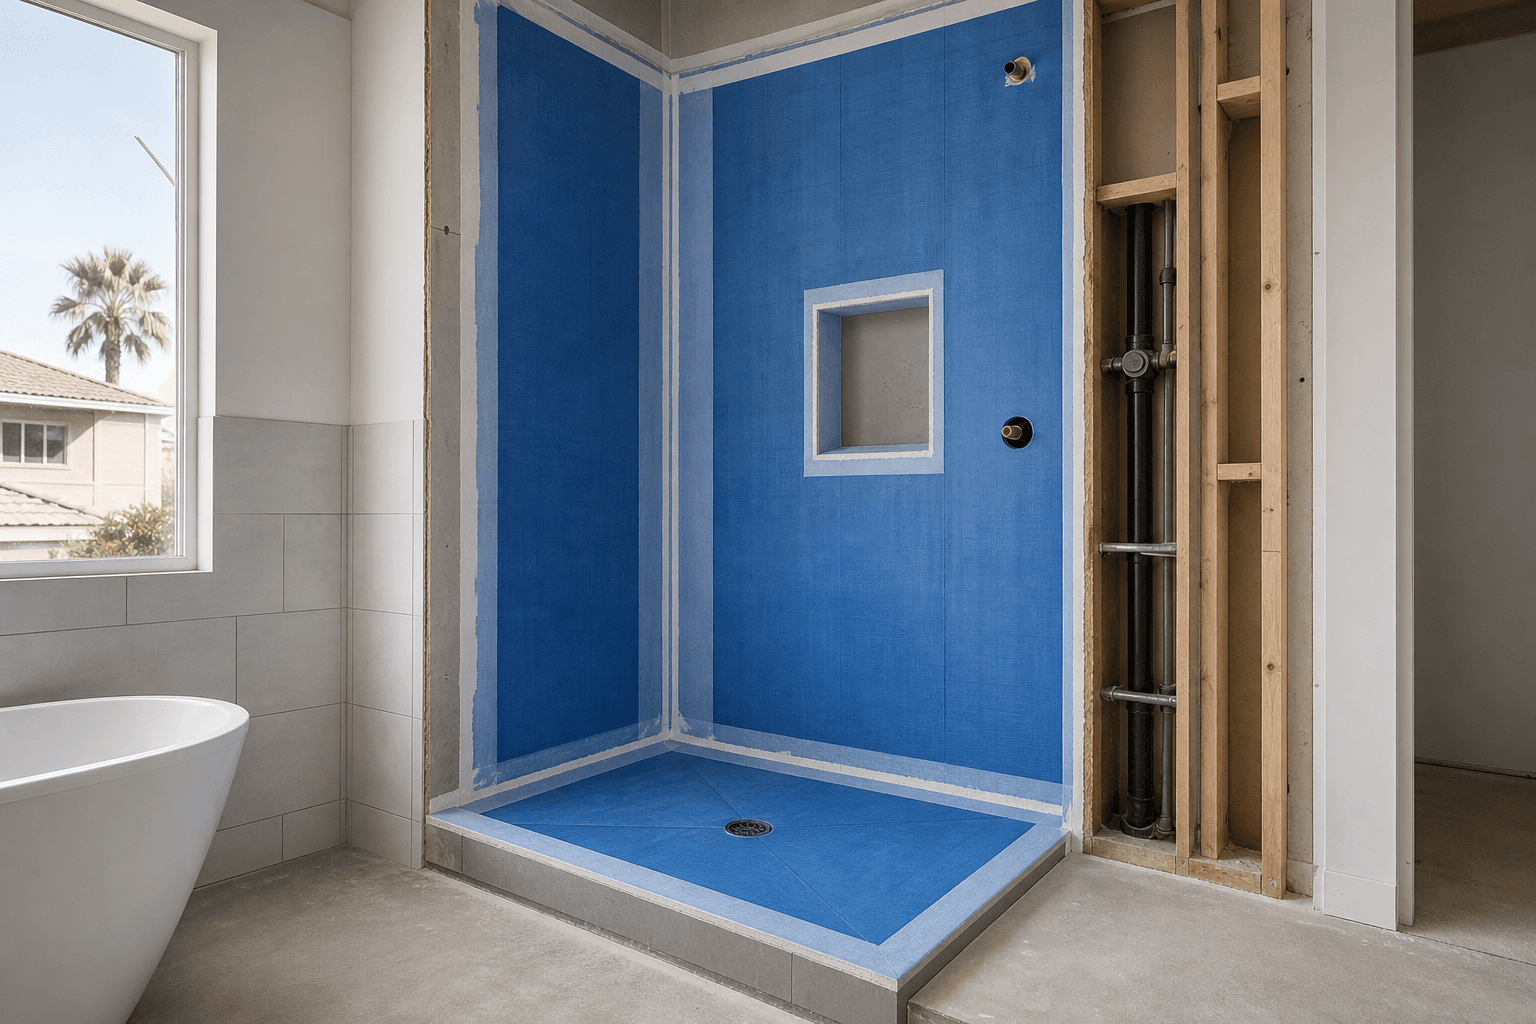
Proper bathroom waterproofing is a continuous moisture-management system behind or beneath wet-area finishes. Tile, grout, and caulk are visible finishes, but they should not be treated as the primary protection for walls, floors, framing, or other building components.
This distinction matters most in showers, tub surrounds, wet rooms, and bathroom floors exposed to regular splashing. California requirements state that shower, bath, and related waterproofing systems must prevent water from entering walls, flooring systems, or other components in a way that causes damage. Review the California waterproofing requirement for the applicable legal language.
Quick summary

- Inspect the concealed waterproofing system before tile covers it.
- Confirm that the substrate, membrane or drainage plane, seams, corners, penetrations, and transitions form a continuous assembly.
- Make sure the shower floor, drain, curb, and threshold direct water toward drainage.
- Ask which system is being used, how materials are compatible, and what testing or documentation applies.
- Choose a repair, cosmetic refresh, or full remodel based on the condition of the concealed assembly, not only tile appearance.
What bathroom waterproofing must do
A bathroom waterproofing assembly must manage water beyond the finished surface. It should limit moisture from reaching vulnerable building components and direct water toward a drain or another intended drainage path. The exact layers vary by design, product system, and installation method.
Building-science guidance recommends protecting tub and shower assemblies from moisture and using a drainage-plane material beneath backerboards in assemblies designed for that approach. The key principle is continuity: water should not find an unprotected path through a joint, corner, fastener, opening, or change in plane. Review water-management guidance for tub and shower assemblies.
Map every wet area before choosing materials

Start with areas that receive water, not simply areas where tile will be installed. Shower walls and floors, tub surrounds, curbs, benches, niches, thresholds, and wet-room transitions all need a deliberate moisture-management plan. A bathroom floor outside the shower may also need additional protection depending on the layout, fixtures, drainage, and project requirements.
Backerboard or another moisture-resistant backing material can provide a suitable base for a wet-area finish, but it does not automatically make the entire assembly waterproof. Special protection is needed behind tile or panel finishes, and the selected backing must work with the rest of the system.
Bathroom waterproofing best practices to review
1. Prepare a suitable, stable substrate
Waterproofing begins with the surface and structure supporting it. Framing and backing should be stable, properly aligned, clean, and suitable for the selected membrane or drainage approach. Damaged materials, movement, uneven planes, and improperly treated joints can create problems before tile installation begins.
Ask how the contractor will handle board joints, fasteners, corners, and changes between substrates. Product instructions matter because a system designed for one backing, adhesive, or installation condition may not suit another.
2. Create continuous waterproofing across the wet area
A surface-applied membrane, sheet system, or behind-the-board drainage approach should extend across areas exposed to water. That means planning walls, floors, corners, curbs, benches, niches, and transitions together rather than waterproofing isolated patches.
For professional installation, compare your checklist with how contractors approach bathroom waterproofing, including tile work and waterproofing beneath wet-area finishes. JR07 Development lists bathroom remodeling services that include tile work, waterproofing, shower and tub installation, and modern fixtures.
Look for a defined termination at the top and sides of the wet area. A membrane that stops short of a vulnerable transition can leave the assembly dependent on surface finishes that were never intended to perform as the sole waterproofing layer.
3. Plan shower slopes and drainage
Water needs a reliable route away from the shower floor. The shower floor, waterproofing layer, drain connection, curb, threshold, and finished tile must work together so water does not collect in unintended areas.
Do not judge the slope only by looking at finished tile. Ask how the underlying shower pan or waterproofing assembly is shaped, how the drain integrates with it, and whether the selected system has specific testing or installation requirements.
4. Treat seams, corners, and penetrations as high-risk details
Inside and outside corners, board joints, fasteners, plumbing penetrations, shower valves, niches, benches, and fixture openings interrupt an otherwise continuous surface. Each should be treated according to the selected system using compatible tapes, sealants, collars, or other approved components.
A small unsealed opening can matter more than a large, correctly covered wall. Ask the installer to explain how every penetration and change in plane will be sealed before tile is installed.
5. Verify transitions and material compatibility
Waterproofing may need to connect to a drain, tub flange, bathroom floor, doorway, curb, glass enclosure area, adjacent wall, or different substrate. These interfaces should be identified before installation, not improvised after tile is in place.
Confirm that membranes, sealants, mortars, adhesives, backerboards, drains, and finish materials are intended to work together. A written product schedule or installation plan can clarify responsibility when multiple trades are involved.
6. Treat tile, grout, and sealant as finish components
Tile and grout create the visible surface and help manage everyday exposure, but they are not a substitute for concealed waterproofing. Grout fills tile joints, while flexible sealant is generally used where movement or changes in plane require a more flexible joint.
Fixtures also need properly planned seals and penetrations. Waterproofing, finish installation, and fixture installation should be coordinated as one assembly.
Waterproofing system comparison
No single system is universally best for every bathroom. The right choice depends on the layout, substrate, drainage design, product instructions, installer experience, and project requirements.
| Component | Typical position | What to verify |
|---|---|---|
| Moisture-resistant backing | Behind the finish | It is suitable, supported, aligned, and compatible with the system. |
| Drainage plane | Behind or beneath backing in some assemblies | It is continuous, correctly overlapped, and directs moisture toward drainage. |
| Surface-applied membrane | On the backing or setting surface | Coverage, seams, corners, penetrations, and curing follow system requirements. |
| Mortar or setting layer | Between waterproofed surface and tile | The material suits the membrane, tile, and wet-area conditions. |
| Tile, grout, and sealant | Visible finish and joints | They are not being asked to replace the waterproofing layer. |
Pre-tile waterproofing inspection checklist
The best time to inspect waterproofing is before tile, trim, or fixtures hide it. Take photographs where permitted and ask the installer to explain the assembly in plain language.
- Coverage: Are all intended wet-area surfaces included, including floors, walls, curbs, benches, niches, and transitions?
- Substrate: Are backing and supporting surfaces stable, clean, aligned, and free of visible damage?
- Continuity: Does the membrane or drainage approach connect across walls, floors, corners, and changes in plane?
- Details: Are seams, fasteners, corners, niches, benches, valves, pipes, and fixture openings treated?
- Drainage: Do shower surfaces direct water toward the drain without unintended low spots?
- Transitions: How does the system connect to the tub, drain, curb, threshold, doorway, and adjacent floor?
- Testing: Is a flood test or other inspection appropriate, and how will results be documented?
Questions to ask before approving the work
- Which waterproofing system are you proposing, and why does it suit this bathroom?
- What material is behind the tile, and how will it be protected from moisture?
- How will waterproofing continue through corners, niches, benches, curbs, and plumbing penetrations?
- How will the shower pan, drain, curb, and threshold work together?
- Which products and sealants are compatible?
- Will the waterproofing be inspected or tested before tile is installed?
- What photographs or documentation will show the concealed work?
- Which permit, code, and inspection requirements apply?
When to choose a repair, cosmetic refresh, or full remodel
A cosmetic refresh may be reasonable when the existing waterproofing is known to be sound and work is limited to compatible surface improvements. A targeted repair may suit a localized problem if the surrounding assembly can be opened, inspected, and properly reconnected.
Consider a broader assessment when there are recurring leaks, soft walls or floors, musty odors, mold concerns, failed transitions, loose tile, damaged backing, or no reliable way to verify existing waterproofing. Covering a suspected moisture problem with new tile can hide the cause rather than correct it.
Confirm California and project-specific requirements
This checklist is educational and does not replace a project-specific code review, permit process, or inspection. Requirements can vary with the layout, plumbing changes, wet-room design, property type, and local jurisdiction.
Ask the contractor which requirements apply and confirm details with the relevant building department when needed, especially for permitted remodeling, structural modifications, and conversions that expose larger areas to water.
Bathroom waterproofing FAQ
Does bathroom tile make a shower waterproof?
No. Tile and grout are finish materials. A shower needs a planned waterproofing and drainage assembly behind or beneath the finish.
Should waterproofing cover the bathroom floor outside the shower?
It depends on the layout, fixtures, drainage, thresholds, and project requirements. A wet-room conversion generally needs a broader moisture-management plan than an enclosed shower.
What should homeowners inspect before shower tile is installed?
Inspect substrate condition, coverage, seams, corners, penetrations, niches, benches, drains, slopes, curbs, thresholds, and transitions. Ask whether curing, testing, photographs, or inspection is required before the work is covered.
Is a shower pan flood test always required?
Not necessarily. Testing depends on the assembly, project scope, applicable requirements, and local inspection process. Ask what testing applies and how results will be documented.
Can a bathroom be waterproofed without removing existing tile?
Sometimes a localized repair is possible, but existing tile can conceal substrate and waterproofing conditions. Leaks, movement, soft materials, or repeated failures may require opening the area to identify the underlying problem.
Make the waterproofing decision before the tile decision
A durable bathroom remodel starts with the concealed assembly, not the tile sample. Review how water will be managed, how corners and penetrations will be treated, how the shower will drain, and how the work will be checked before finishes hide it.
JR07 Development is a licensed, bonded, and insured general contractor with more than 25 years of experience and over 500 completed projects. The company offers bathroom remodeling with tile work, waterproofing, shower and tub installation, and dedicated project management across Southern California. To discuss a bathroom remodeling scope, visit JR07 Development.